App Inventor Industry Micro:bit Project
Water level measurement system based on Micro:bit and Smartphone
A water level measurement system is a device or group of devices that is used to measure the water level in a specific location. There are many different types of water level measurement systems, and the appropriate system for a given application will depend on the specific needs and requirements of the user. Some common components of a water level measurement system include sensors to measure the water level, a display or readout to show the water level, and a controller or processor to process the data from the sensors and display it in a usable format. In some cases, a water level measurement system may also include communication or networking capabilities to allow the data to be transmitted to a remote location or to be accessed by multiple users.
There are many different ways to measure the level of water in a tank or container. Some common methods include:
- Float-based level sensors: These use a float that rises or falls with the level of the water. As the float moves, it activates a switch or sends a signal to a device that can display the water level.
- Ultrasonic level sensors: These use sound waves to measure the distance to the water’s surface. By measuring the time it takes for the sound waves to bounce back, the sensor can calculate the water level.
- Pressure sensors: These measure the hydrostatic pressure exerted by the water on the bottom of the tank. The pressure is directly proportional to the water level, so it can be used to determine the water level.
- Radar level sensors: These use radar waves to measure the distance to the water’s surface. The sensor sends out a radar pulse and measures the time it takes for the pulse to bounce back from the water’s surface.
- Visual measurement: This method involves simply looking at the water level in the tank and manually measuring it with a ruler or measuring tape.
There are pros and cons to each method, and the best option for you will depend on your specific needs and the characteristics of the tank or container you are measuring.
A water level measurement system based on Micro:bit and a smartphone via Bluetooth is a system that uses a Micro:bit, a small programmable microcontroller, to measure the water level in a tank or reservoir, and then sends the data to a smartphone via Bluetooth for display and analysis.
Here’s an overview of how the system could work:
- The Micro:bit is connected to a water level sensor, which can be a float sensor, ultrasonic sensor, or any other sensor that is suitable for measuring the water level in a tank or reservoir.
- The Micro:bit reads the output of the sensor and converts it into a digital signal that represents the water level.
- The Micro:bit uses its built-in Bluetooth module to send the water level data to a smartphone that has a Bluetooth module and is running a dedicated app.
- The app on the smartphone receives the data and displays it in a user-friendly format, such as a graph or a numerical value.
- The user can use the app to set alerts for low or high water levels, and even forward the data to the cloud for remote monitoring.
The Micro:bit is a powerful microcontroller that can be programmed using a variety of programming languages, such as Python, Makecode, and JavaScript. The Bluetooth module on the Micro:bit is fully integrated and easy to use, making it a great choice for wireless communication.
The App could be developed using android or ios app development toolkits like App Inventor etc.
Purpose of project :
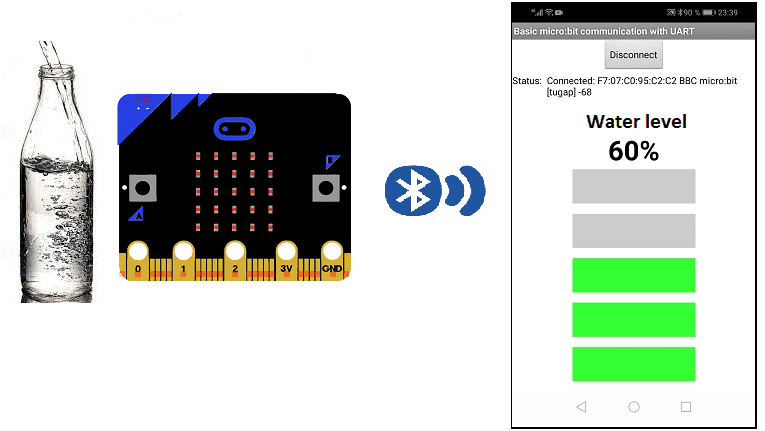
In this project, we will build a smartphone-based bottle water level monitoring system using Micro:bit. Our proposed work will be easy for real-time liquid level measurement using Bluetooth wireless technology.
This is why we will create two programs: a mobile application with App Inventor for the smartphone and a program for the Micro:bit card.
Description of the operation of the measurement system:
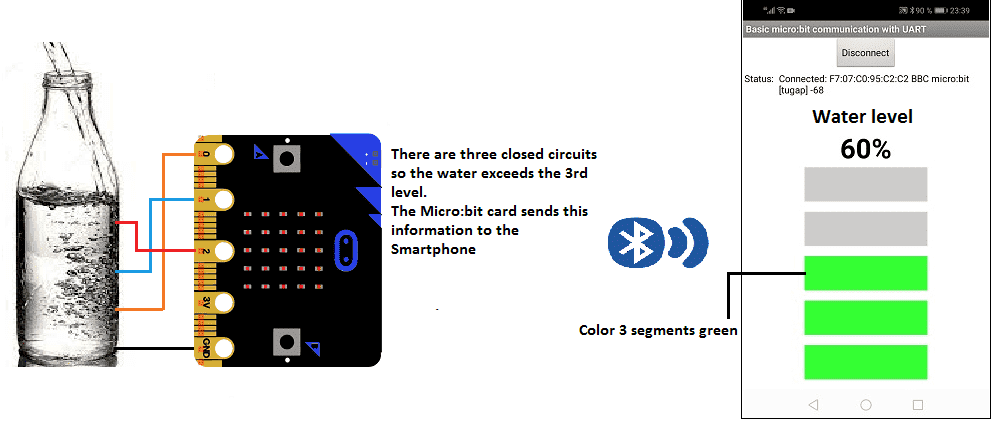
We know that water, like any other liquid, is a conductor of electric current.
The detection of the level of water filled in the bottle is based on this idea.
When the water level rises, this liquid comes into contact with the end of the connection wire fixed in the bottle, the electrical circuit is then closed and an electrical current under very low voltage is detected by the Micro:bit card.
When the water level drops, the electrical circuit is open. As a result, there is no more electric current.
Then the Micro:bit card sends this information to the Smartphone via Bluetooth.
Necessary Components
Micro:bit
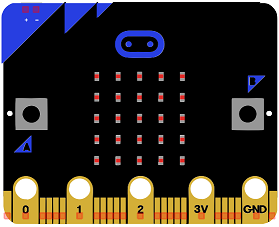
The BBC micro:bit is a small computing device developed by the BBC for use in computer education in the UK. It is a small, self-contained computer with an ARM Cortex-M0 processor, a 5×5 LED matrix, two buttons, and various sensors and input/output (I/O) devices. It is programmed using a web-based code editor and can be used to create a wide variety of interactive projects, such as games, displays, and sensors. The micro:bit is designed to be easy to use and accessible to beginners, with a focus on hands-on, experiential learning. It is also designed to be highly customizable and can be extended using various add-on boards and hardware.
Micro:bit GPIO Board T
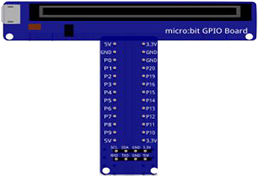
A Micro:bit GPIO board is a type of expansion board that connects to the Micro:bit and provides additional input/output capabilities. They are often used to interface the Micro:bit with external devices such as sensors, actuators, or other electronics. They typically include a set of connectors, such as pins or sockets, that can be used to connect the Micro:bit to external devices, and may also include additional features such as power rails or built-in components. These boards can help to make the development of physical computing projects with the Micro:bit easier and more accessible by providing a variety of connectors and power options.
test plate

A test plate is a type of device used in robotics to test the functionality and performance of various components or systems. It is typically a physical platform or structure that is designed to hold and support various test items or devices, such as sensors, actuators, motors, or other types of mechanical or electrical components. Test plates can be used to simulate different environments or conditions, such as temperature, humidity, vibration, or other factors, in order to evaluate the performance of the components or systems being tested. They can also be used to perform a variety of diagnostic or diagnostic tests, such as stress testing, endurance testing, or other types of evaluations.
connecting wires

Wires are used to transmit electrical signals and power to various components such as motors, sensors, and microcontrollers. It’s important to properly route and secure the wires to prevent tangles and damage. There are several methods for doing this, including using cable ties, clamps, and wire looms. It’s also a good idea to use different colors or labeling to identify the different wires and their functions. When connecting wires in a robot, it’s important to follow proper safety procedures, such as using the correct wire stripper and connectors, and wearing protective equipment such as gloves and safety glasses.
Assembly:
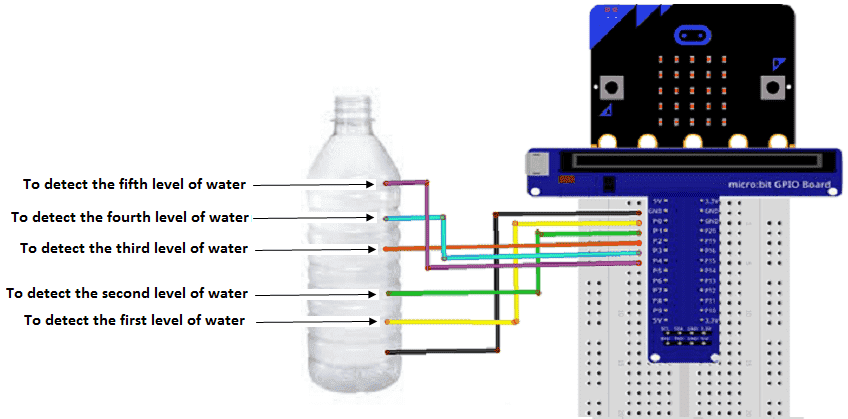
First We drill six holes in the bottle. Then we fix a connection wire in each hole.
Then we connect:
-
the lowest connecting wire to the GND pin of the Micro:bit
-
the 2nd connection wire to pin P0 of the Micro:bit
-
the 3rd connection wire to pin P1 of the Micro:bit
-
the 4th connection wire to pin P2 of the Micro:bit
-
the 5th connection wire to pin P3 of the Micro:bit
-
the 6th connection wire to pin P4 of the Micro:bit
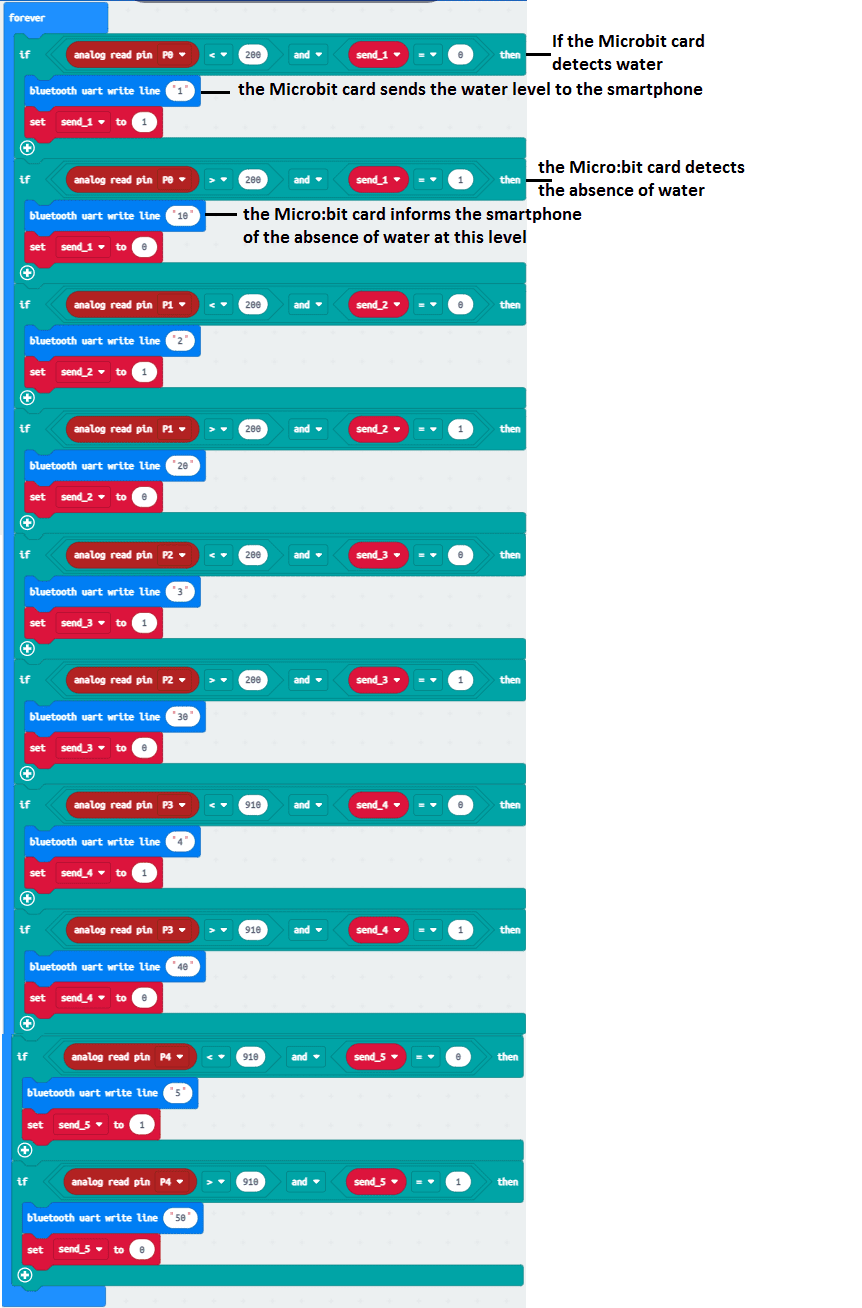
Makecode program
Here is the Makecode program which detects the level of water filled in the bottle and sends this information to the Smartphone via Bluetooth.
Création de l’application avec App Inventor:
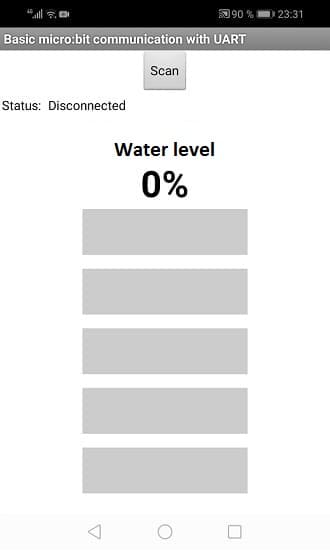
On va créer une application mobile nommée microbit_water_level’ avec App Inventor qui permet de recevoir le niveau d’eau dans la bouteille mesuré par la carte Micro:bit.
On vous propose donc de réaliser le design de l’application, avec le visuel suivant:
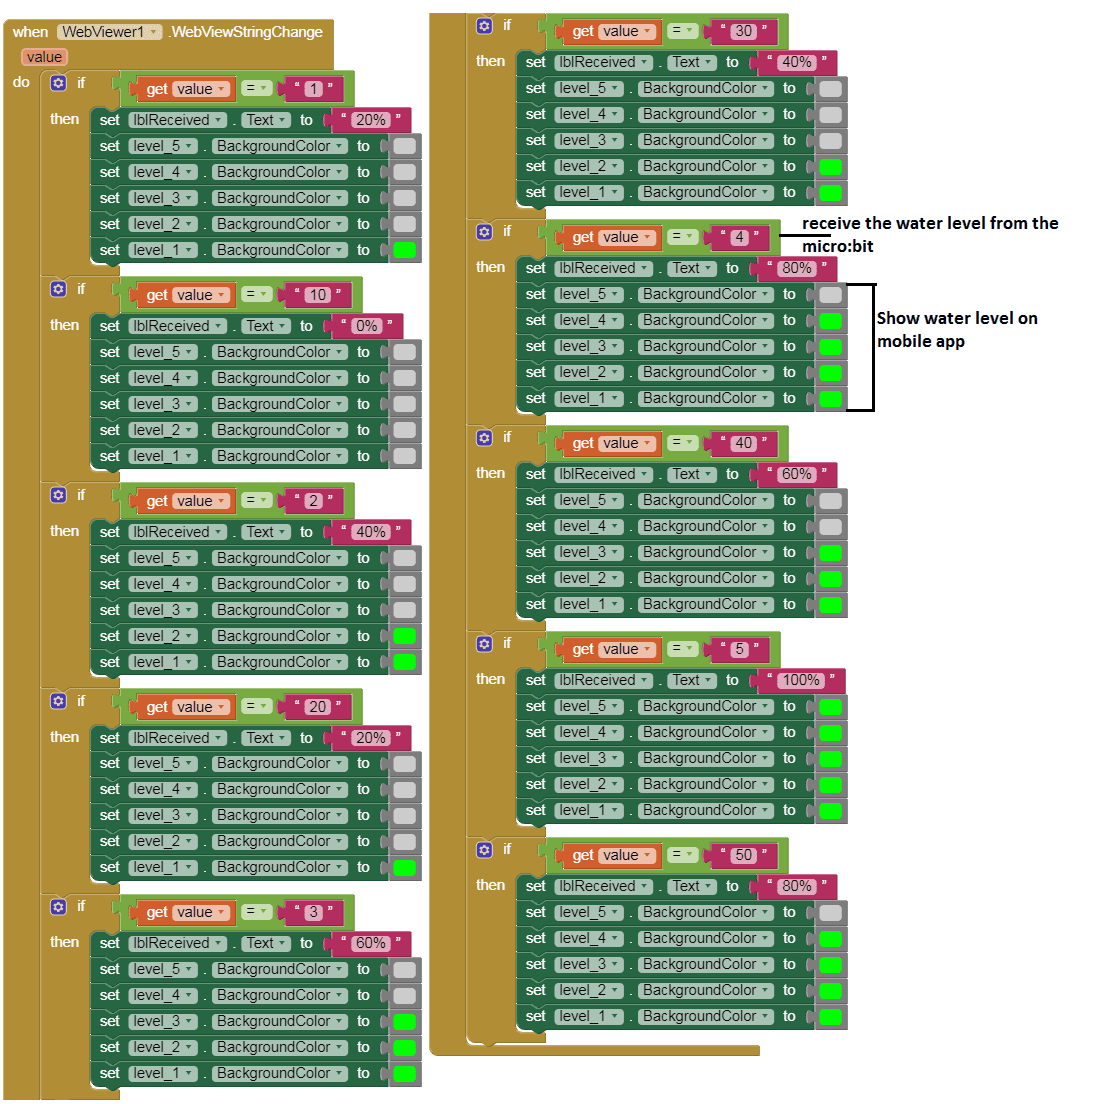
Programmation avec App Inventor
Pour programmer l’application, App Inventor nous propose d’utiliser L’espace Blocs qui permet de créer un programme sous forme de schéma bloc. Très simple d’utilisation mais nécessitant un peu de logique de programmation.
Voici le programme de l’application réalisée dans l’espace Blocs de l’App Inventor:
You can also see

0 commentaire
Leave a comment


Recent tutorials


Most viewed tutorials


Most commented tutorials


Scroll to Top