App Inventor Car Micro:bit Project
Controlling a car using a smartphone and Micro:bit
Definition of robot car
A robot car is a type of mobile robot that is designed to move on wheels or tracks. It can be controlled remotely or autonomously, and it can be outfitted with a variety of sensors and other equipment to perform various tasks.
Here are some examples of tasks that a robot car can perform:
- Autonomous navigation: A robot car can use sensors such as cameras, lidar, or ultrasonic sensors to map its environment and navigate to specific locations.
- Obstacle avoidance: A robot car can use sensors such as infrared or ultrasonic sensors to detect and avoid obstacles in its path.
- Object detection and tracking: A robot car can use cameras and machine learning algorithms to detect and track objects such as people or vehicles.
- Data collection: A robot car can be outfitted with sensors such as cameras, lidar, or air quality sensors to collect data for various applications such as surveying, environmental monitoring, or traffic monitoring.
Robot cars can be used in various fields such as:
- Robotics research and development
- Logistics and delivery
- Inspection and maintenance of industrial sites
- Surveillance and security
- Agriculture and environmental monitoring
- Autonomous transportation.
A robot car controlled by Microbit is a type of mobile robot that is designed to move on wheels or tracks and is controlled by a Microbit, a small, low-cost computer developed by the BBC for educational purposes. The Microbit can be programmed using a variety of programming languages such as MakeCode, Python, or JavaScript.
Purpose of this tutorial:
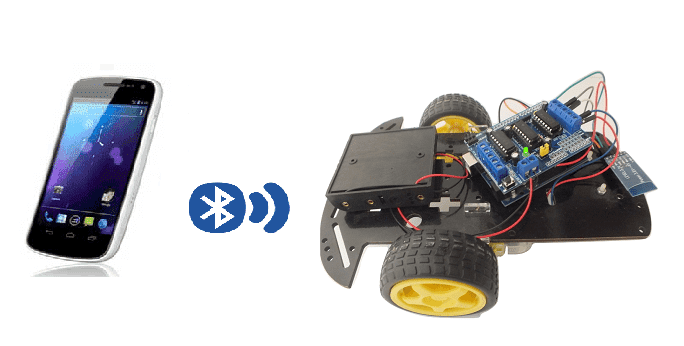
In this tutorial, we will control a car using the Micro:bit card and a smartphone.
we create two programs: a mobile application with App Inventor for the smartphone and a makecode program for the Micro:bit card.
Controlling a car using a smartphone and Micro:bit is a way to remotely control a robot car using a smartphone to send commands to a Micro:bit, which is connected to the car’s motor controller. Here’s an example of how it could work:
- Connect the Micro:bit to the car’s motor controller, which controls the movement of the car’s wheels.
- Write a program on the Micro:bit that receives commands via Bluetooth and sends them to the motor controller to control the movement of the car.
- Use the Micro:bit‘s built-in accelerometer or other sensors to control the movement of the car, such as tilting the Micro:bit to control the direction of the car.
- Use the Micro:bit‘s Bluetooth capabilities to communicate with a smartphone or other device to remotely control the car.
- On the smartphone, you can use an app to control the car, such as sending command to move forward, backward, left or right.
Necessary components
Micro:bit
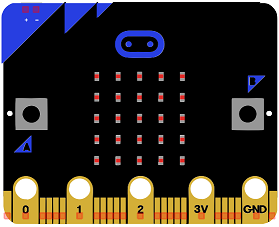
The micro:bit is a small, low-cost computer designed for educational use, particularly in the fields of computer science and engineering. It is about the size of a credit card and can be programmed using a variety of languages, including Python, JavaScript, and Microsoft Block Editor. The device features a small LED matrix display, two buttons, a built-in accelerometer, and a radio module for wireless communication. The micro:bit is intended to be used as a tool for teaching children how to code and how to create their own digital devices and projects.
Micro:bit GPIO Card
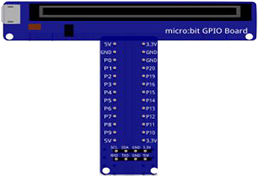
The micro:bit GPIO card is an expansion board for the micro:bit computer that adds additional input and output (I/O) pins, known as General Purpose Input/Output (GPIO) pins. These pins allow the micro:bit to connect to a wide variety of sensors, actuators, and other devices, providing more flexibility and functionality for projects and experiments. The GPIO card typically includes a number of different types of I/O pins, such as digital input/output pins, analog input pins, and PWM (pulse-width modulation) output pins. It also provides a breadboard area to connect electronic components to the micro:bit. With the GPIO card, the micro:bit can be used to control a wide range of devices such as motors, LEDs, sensors and more.
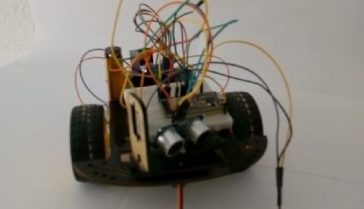
2 wheel car robot kit
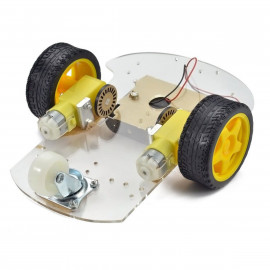
A 2-wheel car robot kit is a collection of components that can be used to build a small, autonomous robot that moves on two wheels. These kits typically include a microcontroller, such as a ESP32 card, to control the robot’s movements, as well as motors, wheels, and other hardware to enable the robot to move and navigate.
2-wheel car robots are often used as educational tools, as they can be used to teach basic principles of robotics, electronics, and programming. They can also be used as a platform for experimenting with different control algorithms, sensors, and other hardware.
This robot kit is composed of:
-
car chassis.
-
2 gear motors (1:48)
-
2 car tires
-
1 universal wheel
test plate

A test plate is a type of device used in robotics to test the functionality and performance of various components or systems. It is typically a physical platform or structure that is designed to hold and support various test items or devices, such as sensors, actuators, motors, or other types of mechanical or electrical components. Test plates can be used to simulate different environments or conditions, such as temperature, humidity, vibration, or other factors, in order to evaluate the performance of the components or systems being tested. They can also be used to perform a variety of diagnostic or diagnostic tests, such as stress testing, endurance testing, or other types of evaluations.
connecting wires

Wires are used to transmit electrical signals and power to various components such as motors, sensors, and microcontrollers. It’s important to properly route and secure the wires to prevent tangles and damage. There are several methods for doing this, including using cable ties, clamps, and wire looms. It’s also a good idea to use different colors or labeling to identify the different wires and their functions. When connecting wires in a robot, it’s important to follow proper safety procedures, such as using the correct wire stripper and connectors, and wearing protective equipment such as gloves and safety glasses.
For the assembly of the car you can see the following article: https://www.robotique.tech/robotics/development-of-a-remote-control-car-with-microbit/
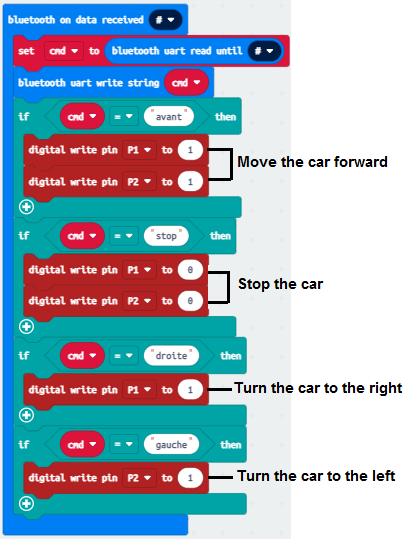
Makecode program
Here is the makecode program which allows you to connect the Micro: bit card to the smartphone and to receive a message containing the command order of the car.
Creation of the application with App Inventor:
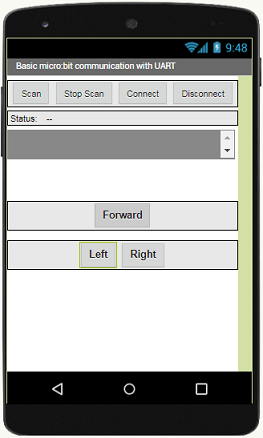
We are going to create a mobile application called ‘commander_voiture’ with App Inventor which allows you to control the car from the smartphone.
We propose to create the design of the application, with the following visual:
Programming with App Inventor
To program the application, App Inventor offers us to use the Blocks space, which allows you to create a program in the form of a block diagram. Very easy to use but requiring a little programming logic.
Here is the program of the application created in the Blocks area of the Inventor App:
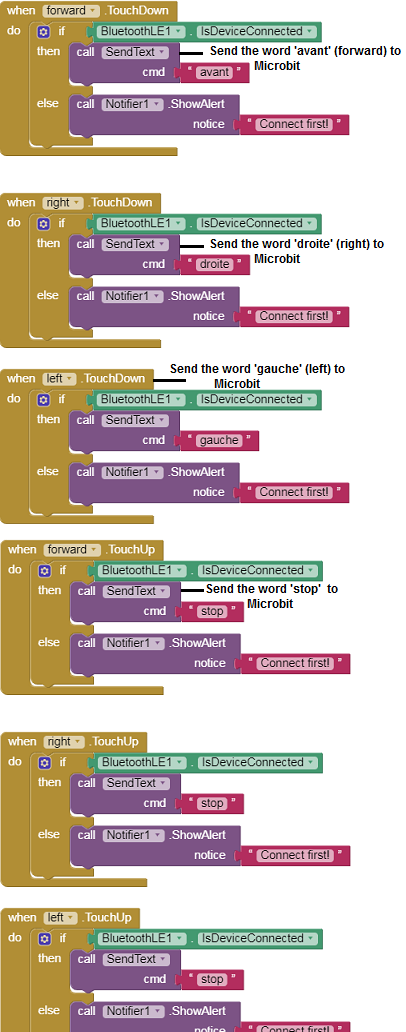
After installing the mobile application on your Smartphone, follow these steps to connect to the Micro:bit card:
- Click on the ‘scan‘ button
- After finding the Micro:bit card, Click on the ‘Stop Scan’ button
- Tap the name of the Micro:bit card
- Finally click on the ‘connect’ button
You can also see

2 commentaires
Leave a comment


Recent tutorials


Most viewed tutorials


Most commented tutorials


Scroll to Top
Car Detailers 02-12-2323
Excellent, what a weblog it is! This webpage gives valuable information to us, keep it up.
Darwin 24-08-2121
que extensiones se utilizan. ??? podrían ayudarme con el código en app inventor.