App Inventor Arduino DC Motor
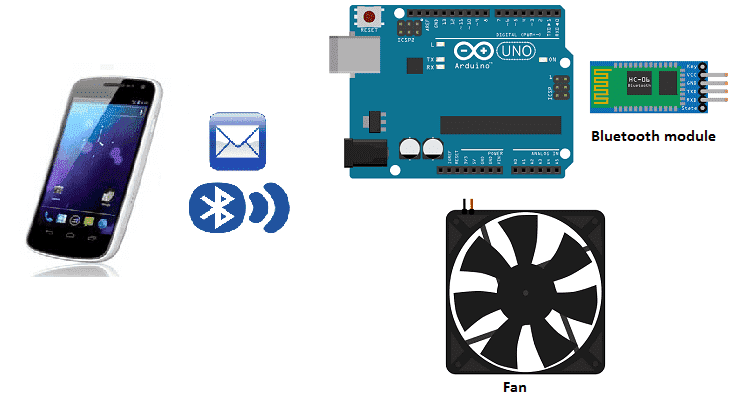
Control a fan with smartphone and Arduino
Arduino is an open-source electronics platform based on simple software and hardware. It can be used to control a wide variety of devices, including LEDs, motors, and sensors. Bluetooth is a wireless communication technology that allows devices to connect to each other over short distances. Arduino boards can be used with Bluetooth modules to enable wireless communication between devices. This can be used for a variety of applications, such as controlling a robot or sending sensor data wirelessly to a computer or phone.
Purpose of this tutorial:
Arduino boards can be used with HC-06 Bluetooth modules to enable wireless communication between an Arduino and a smartphone. This can be done using the Bluetooth Serial Profile, which allows the Arduino to act as a serial port over Bluetooth. Once the Arduino and the smartphone are connected, data can be sent in both directions. The Arduino can receive commands from the smartphone or send sensor data to the smartphone for display or further processing. There are many libraries available for Arduino that make it easy to set up and use Bluetooth communication with a smartphone.
In this tutorial, we will control a small fan by bluetooth using the Arduino board and a smartphone.This is why we will create two programs: a mobile application with App Inventor for the smartphone and a program for the Arduino board.
Necessary components
Arduino UNO

The Arduino UNO is a popular model of the Arduino open-source electronics platform. It is based on the ATmega328 microcontroller and has 14 digital input/output pins, 6 analog inputs, a 16 MHz quartz crystal, a USB connection, and a power jack. The UNO also has a built-in USB-to-serial converter, which allows it to be programmed and communicate with a computer via a USB cable. The Arduino UNO can be used for a wide variety of projects, including controlling LEDs, motors, and sensors, as well as communicating with other devices via Bluetooth, WiFi, or other wireless technologies. It’s an easy-to-use board that can be programmed using the Arduino IDE, and is a good option for beginners and experts alike.
HC-06 Bluetooh module
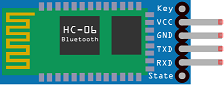
The HC-06 Bluetooth module is a small, low-cost device that can be used to add Bluetooth functionality to a wide range of electronic devices. It is a slave-only device, meaning it can only connect to other Bluetooth devices, and cannot initiate connections itself. It is commonly used in DIY projects, such as adding wireless control to a robot or remote control to a device. It can be easily interfaced with microcontrollers such as Arduino and Raspberry Pi, and communicates via serial communication.
5V Fan
A 5V fan is a type of cooling fan that operates on a 5-volt DC power supply. These fans are commonly used in a variety of electronic devices, such as computers, servers, and other equipment that generates heat. They are also used in DIY projects and hobbyist applications. Because they operate on a lower voltage, they typically consume less power and generate less noise than fans that operate on higher voltages. They are typically smaller in size than other fans. They typically come in the form of a DC motor that spins a rotor with blades. They are connected to the power source with a lead wire and come in different sizes and airflow rates.
Relay

A relay is an electrically operated switch that allows a low power circuit to control a high power circuit. It consists of an electromagnet that, when energized, moves a set of contacts to either make or break an electrical connection. Relays are used in a wide range of applications, such as controlling lights and motors, and providing isolation between different circuits. They are commonly used in automotive, industrial, and home automation systems. The most common types of relays are electromechanical relays (EMRs) and solid-state relays (SSRs). EMRs use an electromagnet to physically move a set of contacts, while SSRs use semiconductor devices such as transistors to switch the current.
The relay is used to turn the fan on and off.
Test plate

A test plate is a type of device used in robotics to test the functionality and performance of various components or systems. It is typically a physical platform or structure that is designed to hold and support various test items or devices, such as sensors, actuators, motors, or other types of mechanical or electrical components. Test plates can be used to simulate different environments or conditions, such as temperature, humidity, vibration, or other factors, in order to evaluate the performance of the components or systems being tested. They can also be used to perform a variety of diagnostic or diagnostic tests, such as stress testing, endurance testing, or other types of evaluations.
Connecting wires

Wires are used to transmit electrical signals and power to various components such as motors, sensors, and microcontrollers. It’s important to properly route and secure the wires to prevent tangles and damage. There are several methods for doing this, including using cable ties, clamps, and wire looms. It’s also a good idea to use different colors or labeling to identify the different wires and their functions. When connecting wires in a robot, it’s important to follow proper safety procedures, such as using the correct wire stripper and connectors, and wearing protective equipment such as gloves and safety glasses.
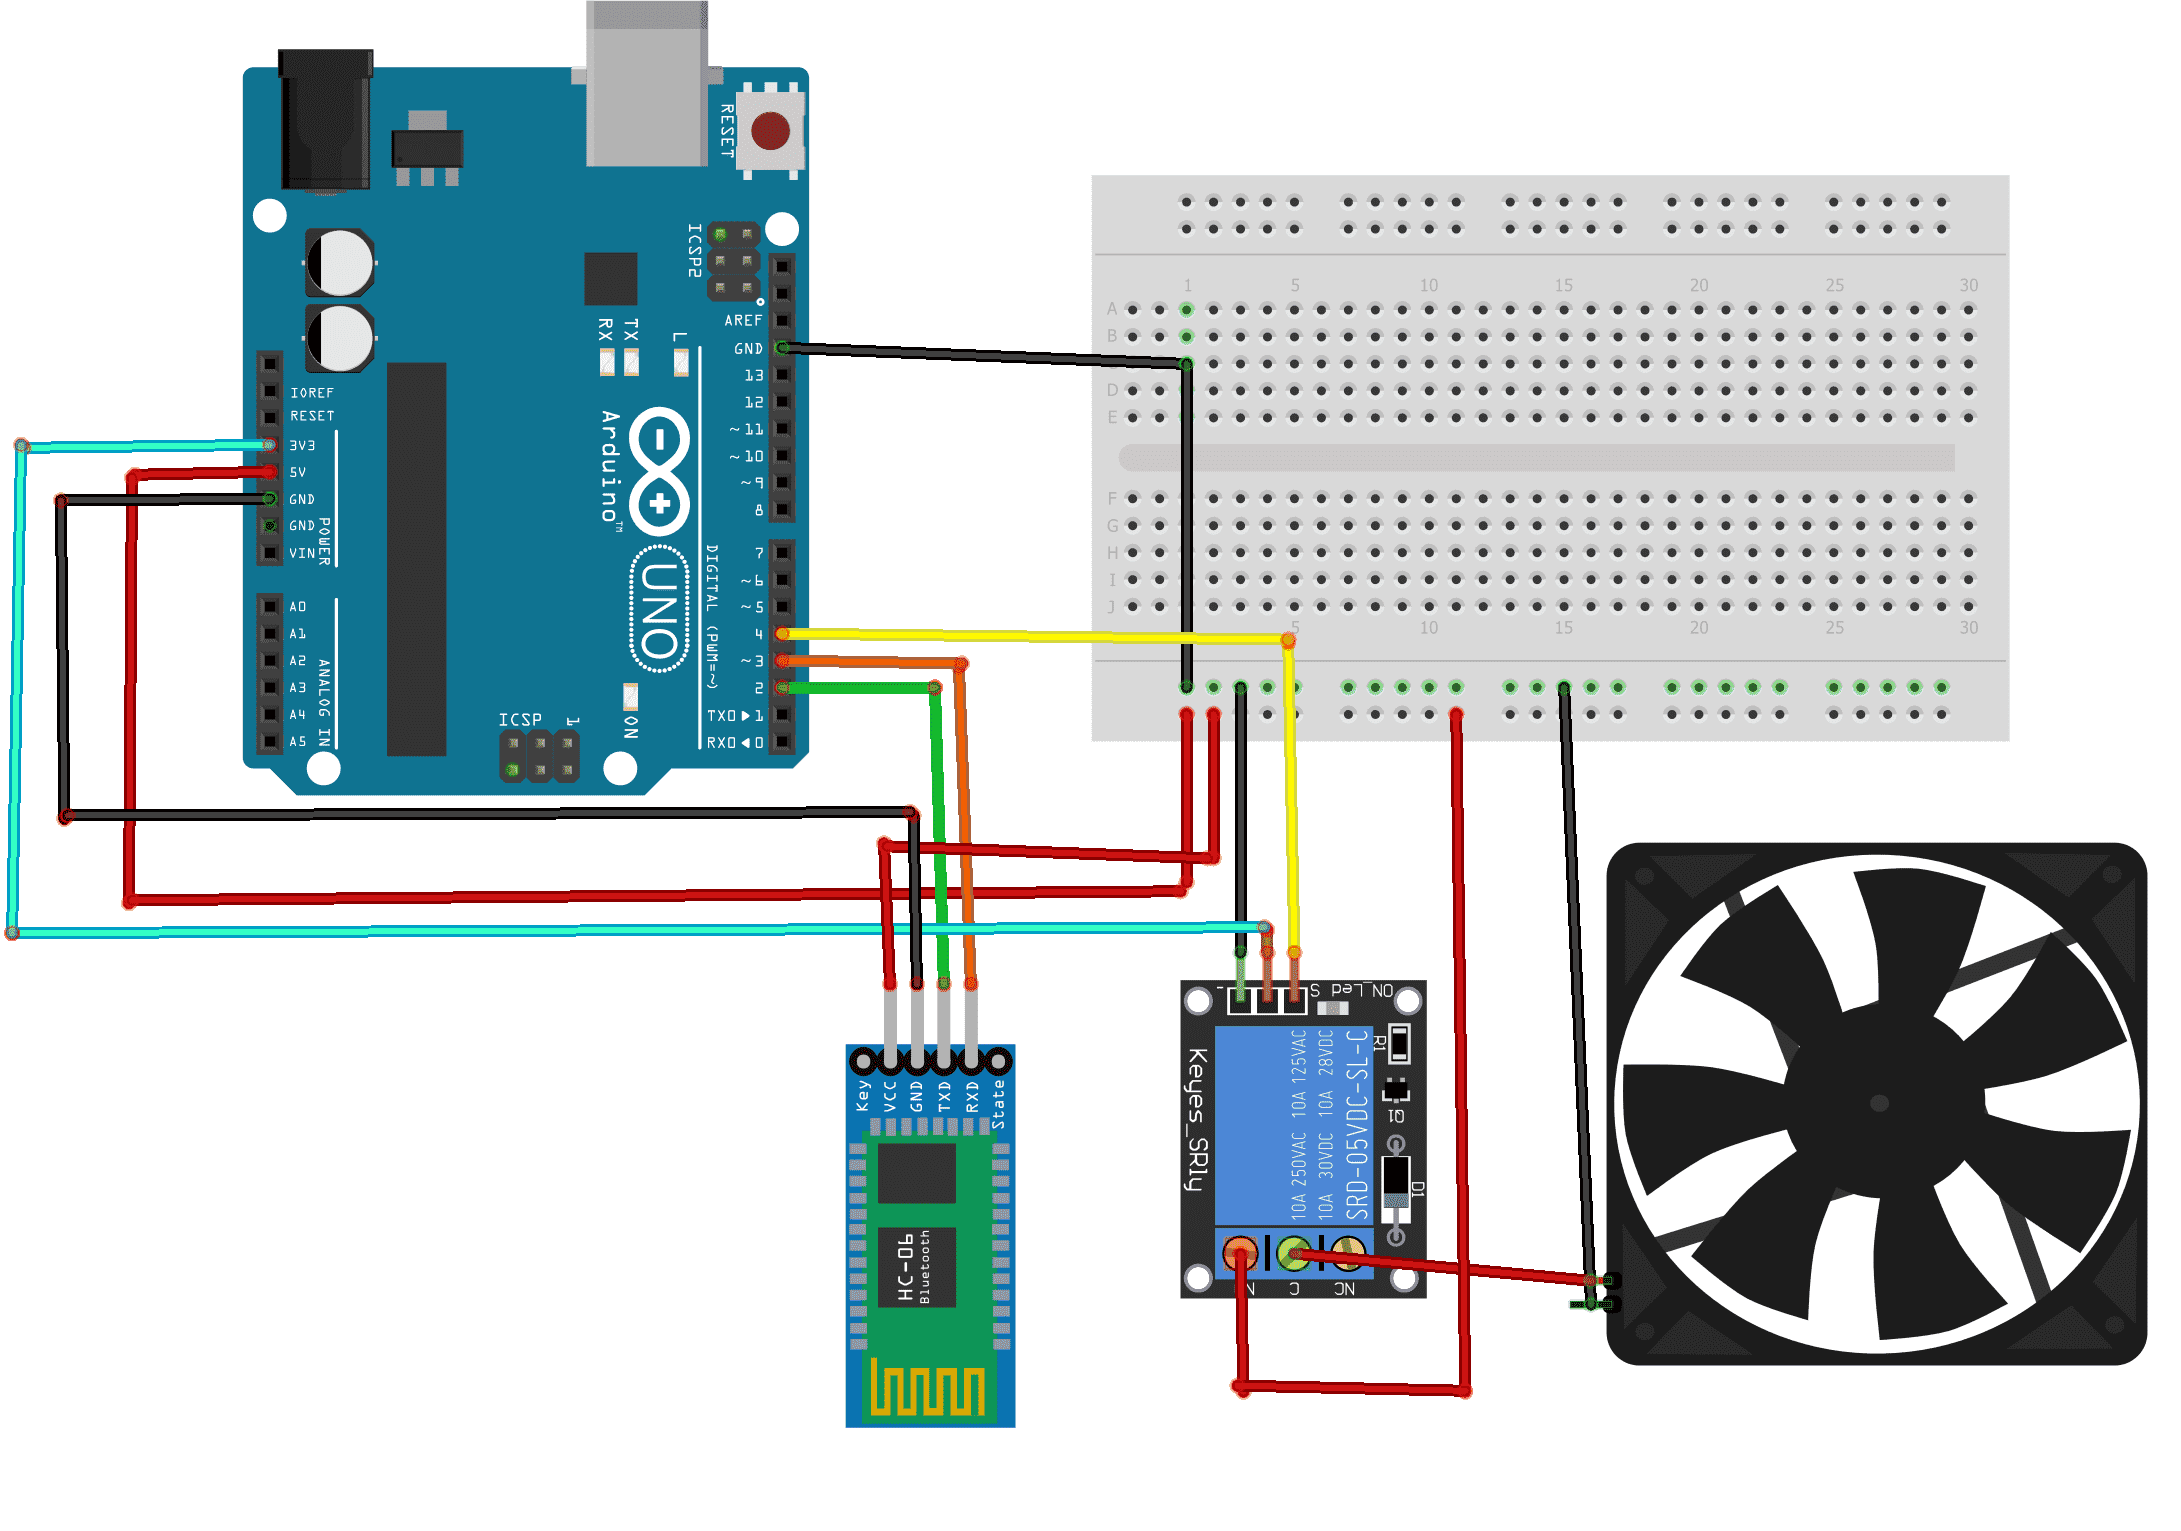
Mounting
To carry out the assembly, you can connect:
Relay:
-
pin (S) to digital pin 4 of Arduino
-
pin (-) to GND pin of Arduino
-
pin (+) to 3.3V pin of Arduino
-
(ON) pin to 5V pin of Arduino
Fan:
-
the first terminal to the COM pin of the relay
-
the second terminal to the GND pin of the Arduino
Bluetooth module:
-
the GND pin to GND of Arduino
-
the VCC pin to the 5V pin of Arduino
-
the RXD pin to the digital pin 3 of Arduino
-
the TXD pin to the digital pin 2 of Arduino
Program
Here is the program that allows you to connect the Arduino board to the smartphone and receive a message containing the order to start or stop the fan.
|
1 2 3 4 5 6 7 8 9 10 11 12 13 14 15 16 17 18 19 20 21 22 23 24 25 26 27 28 29 30 31 32 33 34 35 |
#include <SoftwareSerial.h> SoftwareSerial hc06(2,3); String cmd=""; void setup(){ pinMode(4,OUTPUT); //Initialize Serial Monitor Serial.begin(9600); //Initialize Bluetooth Serial Port hc06.begin(9600); } void loop(){ //Read data from HC06 while(hc06.available()>0){ cmd+=(char)hc06.read(); } //Select function with cmd if(cmd!=""){ Serial.print("Command recieved : "); Serial.println(cmd); // We expect ON or OFF from bluetooth if(cmd=="demarrer"){ digitalWrite(4,HIGH);//Start the fan Serial.println("Function is on"); }else if(cmd=="stop"){ digitalWrite(4,LOW);//Stop the fan Serial.println("Function is off"); }else{ Serial.println("Function is off by default"); } cmd=""; //reset cmd } delay(100); } |
Creation of the application with App Inventor:
We are going to create a mobile application named ‘start_ventilateur_arduino’ with App Inventor which allows remote control of the fan.
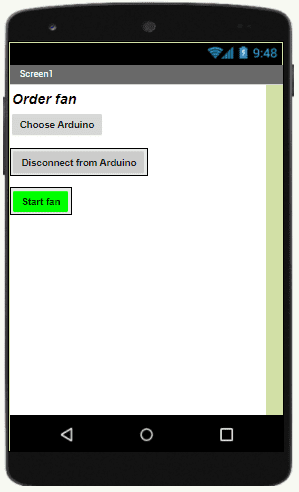
We propose to create the design of the application, with the following visual:
Programming with App Inventor
To program the application, App Inventor offers us to use the Blocks space, which allows you to create a program in the form of a block diagram. Very easy to use but requiring a little programming logic.
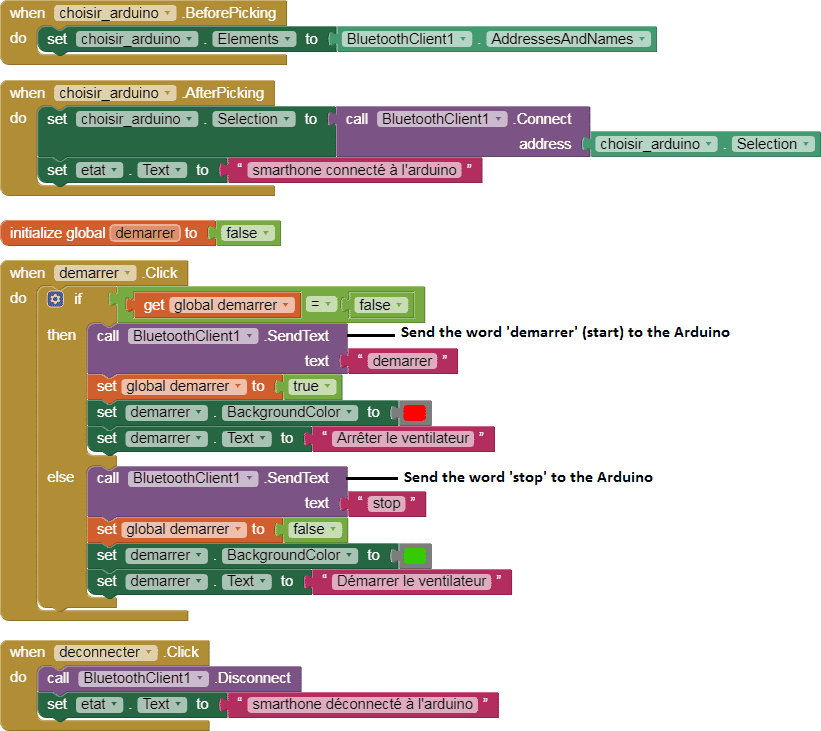
Here is the program of the application created in the Blocks area of the Inventor App:
You can also see

1 commentaire
Leave a comment


Recent tutorials


Most viewed tutorials


Most commented tutorials


Scroll to Top
viglug.org 05-12-2323
Hey There. I found your blog using msn. This is a very well written article. I'll make sure to bookmark it and return to read more of your useful info. Thanks for the post. I will certainly return.