ESP32-CAM
Video Streaming Web Server with ESP32-CAM
Video Streaming Web Server Overview
Video streaming is a technology that allows users to watch videos over the internet without having to download them to their device. Instead, the video is delivered in small chunks over the internet and played in real-time on the user’s device.
Streaming video has become increasingly popular in recent years, with the rise of platforms such as Netflix, Hulu, Amazon Prime Video, and YouTube. These platforms offer a vast library of movies, TV shows, and other video content that users can access on-demand, from anywhere with an internet connection.
Streaming video technology has also made it possible for users to live stream events such as sports games, concerts, and conferences. Live streaming allows viewers to watch events as they happen in real-time, even if they can’t be there in person.
To stream video, users need a reliable internet connection and a device capable of playing video, such as a computer, tablet, or smartphone. The quality of the video stream will depend on the user’s internet connection speed and the quality of the video file being streamed. Some video streaming services also offer the option to adjust video quality settings to improve the viewing experience.
A video streaming web server is a specialized type of web server that is designed to handle the delivery of video content over the internet. This type of server is optimized to deliver large video files to multiple users simultaneously, while maintaining fast load times and minimizing buffering.
Video streaming web servers typically use a protocol called HTTP Live Streaming (HLS) to deliver video content to users. HLS breaks the video file into small segments and delivers them to the user’s device in real-time, allowing the user to start watching the video before the entire file has been downloaded. This can help to reduce buffering and improve the viewing experience.
To set up a video streaming web server, you will need a server that is powerful enough to handle the demands of video streaming, as well as software that is specifically designed for video streaming. Some popular video streaming server software options include Wowza Streaming Engine, Adobe Media Server, and Nginx with the RTMP module.
Creation of the Video streaming Web Server with ESP32-CAM
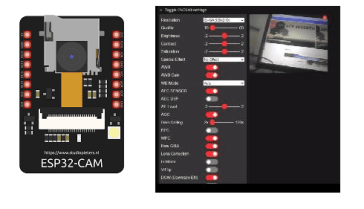
The ESP32-CAM is a low-cost, small-sized, and easy-to-use development board that integrates a camera module and Wi-Fi connectivity. It can be used to build various Internet of Things (IoT) projects, including video streaming web servers.
To set up a video streaming web server with an ESP32-CAM, you will need to follow these general steps:
- Set up the ESP32-CAM board: Connect the board to your computer using a USB cable and install the necessary drivers. You will also need to program the board with the appropriate firmware, such as the ESP32-CAM Video Streaming Web Server firmware.
- Configure the web server: Once the board is set up, you can configure the video streaming web server. This involves setting up the web server software, configuring the Wi-Fi settings, and defining the routes for the video streaming endpoints.
- Connect the camera module: The ESP32-CAM board includes a camera module that can be used to capture video footage. You will need to connect the camera module to the board and configure it to capture video at the desired resolution and frame rate.
- Stream video over the internet: With the web server and camera module configured, you can now start streaming video over the internet. This involves sending video data from the camera module to the web server and using the web server to deliver the video stream to viewers over the internet.
The necessary components :
ESP32-CAM
The ESP32-CAM is a low-cost, small-sized development board that integrates a camera module and Wi-Fi connectivity. It is based on the ESP32 chip, which is a powerful and versatile microcontroller with integrated Wi-Fi and Bluetooth connectivity.
The ESP32-CAM board is designed to be easy to use and can be programmed using the Arduino IDE or other development environments. It includes a camera module with a resolution of up to 2 megapixels and supports various video formats, including JPEG and MJPEG.
The board also includes built-in Wi-Fi connectivity, which allows it to connect to the internet and communicate with other devices. This makes it ideal for building Internet of Things (IoT) projects that involve video streaming or remote monitoring.
Some popular applications of the ESP32-CAM board include:
- Home security: The ESP32-CAM board can be used to build a DIY home security system that includes video monitoring and motion detection. Users can access the video stream remotely using a smartphone app or a web browser.
- Remote monitoring: The board can be used to monitor remote locations, such as a vacation home or a farm. The camera module can capture video footage and send it to a web server or cloud-based platform for storage and analysis.
- Video streaming: The board can be used to build a video streaming platform that allows users to stream live video over the internet. This can be used for applications such as online education, remote conferencing, or live events.
Cp2102 Usb Uart
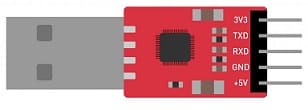
CP2102 is a USB to UART bridge controller that allows a computer to communicate with a serial UART device through the USB port. The CP2102 chip is manufactured by Silicon Labs and is commonly used in embedded systems and microcontroller-based projects.
The CP2102 chip provides a low-cost, easy-to-use solution for connecting a computer to a serial device. It provides a full-featured UART interface with support for data rates up to 921.6 kbps and various flow control options. The chip also includes an on-chip oscillator and voltage regulator, which simplifies the design of the system.
The CP2102 chip is widely used in applications such as:
- USB to serial adapters: The CP2102 chip is commonly used in USB to serial adapters that allow a computer to communicate with a serial device such as a microcontroller or a GPS receiver.
- Embedded systems: The CP2102 chip can be used in embedded systems that require a USB interface for communication with a computer. For example, it can be used in projects such as data loggers, temperature sensors, and robotic controllers.
- Programming interfaces: The CP2102 chip can be used as a programming interface for microcontrollers that do not have built-in USB support. This allows developers to program and debug their microcontroller-based projects using a computer.
The CP2102 can be used to program and communicate with the ESP32-CAM board. For example, you can use the CP2102 to program the ESP32-CAM board with firmware or code and then use it to stream video or communicate with other devices over Wi-Fi.
Montage
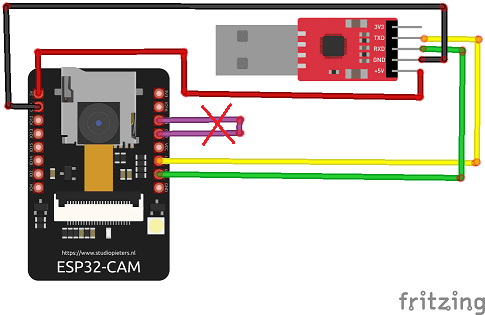
We connect :
-
the UOT pin of the ESP32-CAM board to the RXD pin of the CP2102 converter
-
the UOR pin of the ESP32-CAM board to the TXD pin of the CP2102 converter
-
the 5V pin of the ESP32-CAM board to the 5V pin of the CP2102 converter
-
the GND pin of the ESP32-CAM board to the GND pin of the CP2102 converter
-
the IO0 pin of the ESP32-CAM board to the GND pin of the ESP32-CAM board

Installing ESP32 Module in Arduino IDE
To install the ESP32 module in the Arduino IDE, follow these steps:
- Open the Arduino IDE.
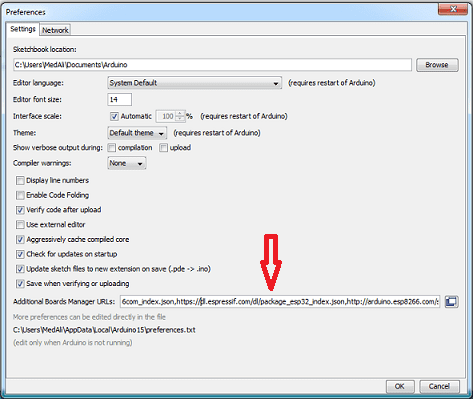
- Go to File > Preferences.

- In the Additional Boards Manager URLs field, enter the following URL: https://dl.espressif.com/dl/package_esp32_index.json
- Go to Tools > Board > Boards Manager.
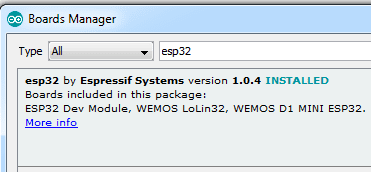
- n the Boards Manager window, search for “ESP32” and select “esp32 by Espressif Systems”.
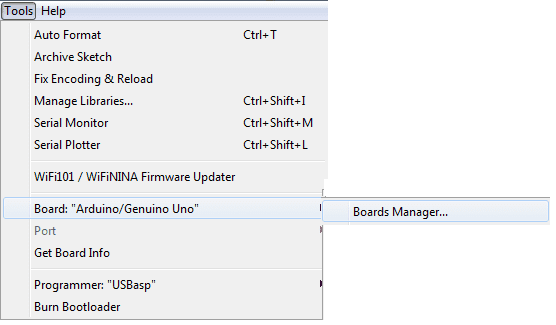
- Click the Install button to install the ESP32 module.
- Once the installation is complete, close the Boards Manager window.
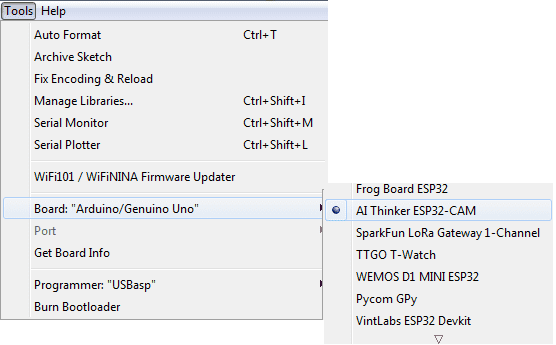
- Go to Tools > Board and select “AI THINKER ESP32-CAM” that you want to use.
- You can now program the ESP32 module using the Arduino IDE.
-
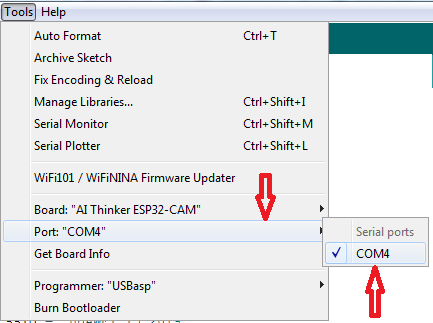
Select the COM port corresponding to your ESP32-CAM in the “Tools” > “Port” menu.
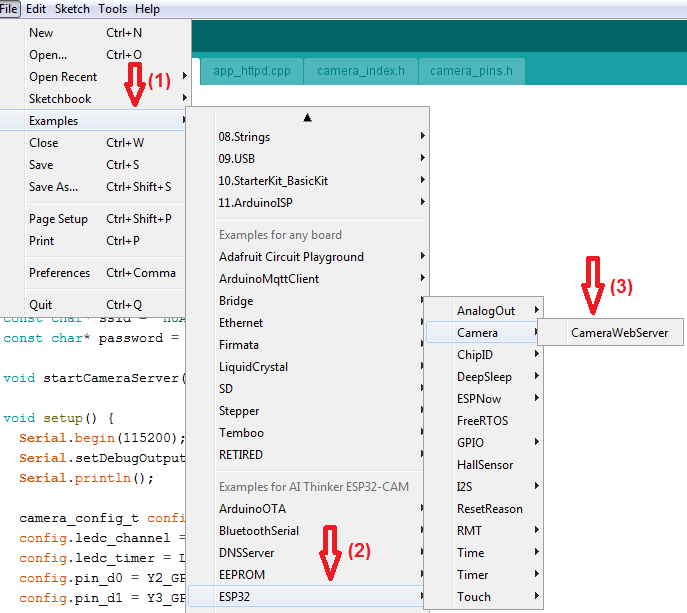
Project import “camerawebserver “
The “camerawebserver” project for the ESP32 is sample code that comes with the ESP32 library for the Arduino IDE. This project allows you to create a web server that broadcasts the video captured by the OV2640 camera integrated into the ESP32-CAM.
To use this project, you need to follow these steps:
-
Open the “camerawebserver” project from the menu “File” > “Exemples” > “ESP32” > “Camera” > “CameraWebServer”.
-
Edit your Wi-Fi network information by replacing the “ssid” and “password” variables in the code.
12const char* ssid = "HUAWEI Y5 2019";const char* password = "b582058c4d86"; -
select the camera model corresponding to the AI THINKER ESP32-CAM module.
This selection is done simply by deleting the “//” of comments in front of the line « #define CAMERA MODEL AI THINKER » and commenting out the line chosen by default:
123456// Select camera model//#define CAMERA_MODEL_WROVER_KIT//#define CAMERA_MODEL_ESP_EYE//#define CAMERA_MODEL_M5STACK_PSRAM//#define CAMERA_MODEL_M5STACK_WIDE#define CAMERA_MODEL_AI_THINKER -
Upload the code to the ESP32-CAM by clicking the “Upload” button.
-
When uploading the program, press the RESET button on the ESP32-CAM board when the IDE tries to connect to the ESP32, during this phase:

-
Wait for the upload to complete
-
Disconnect ESP32-CAM board IO0 pin to ESP32-CAM board GND pin
-
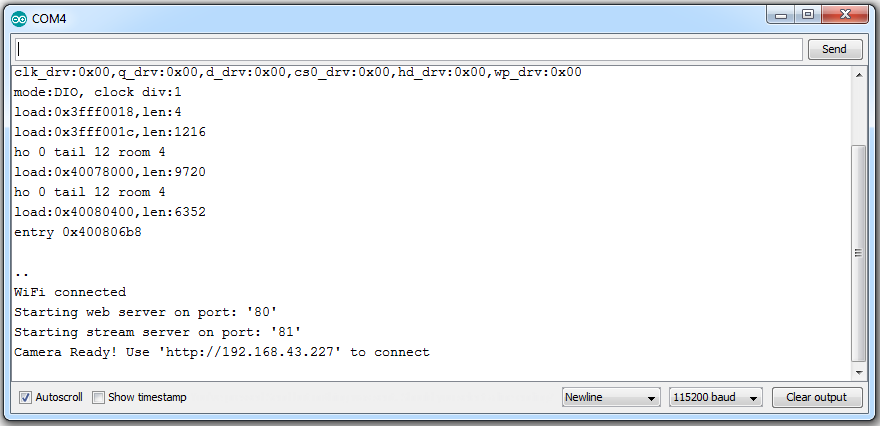
Open Serial Monitor
-
Press the RESET button on the ESP32-CAM board
-
We observe the serial monitor to see the IP address of the ESP32-CAM.
-
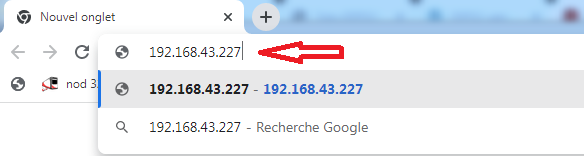
Open a web browser on your computer and enter the IP address of the ESP32-CAM in the address bar.
-
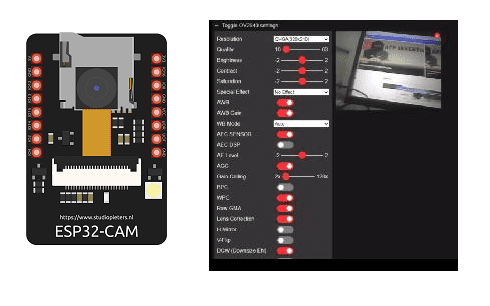
The web page displayed by the ESP32-CAM should contain a live video feed from the OV2640 camera.
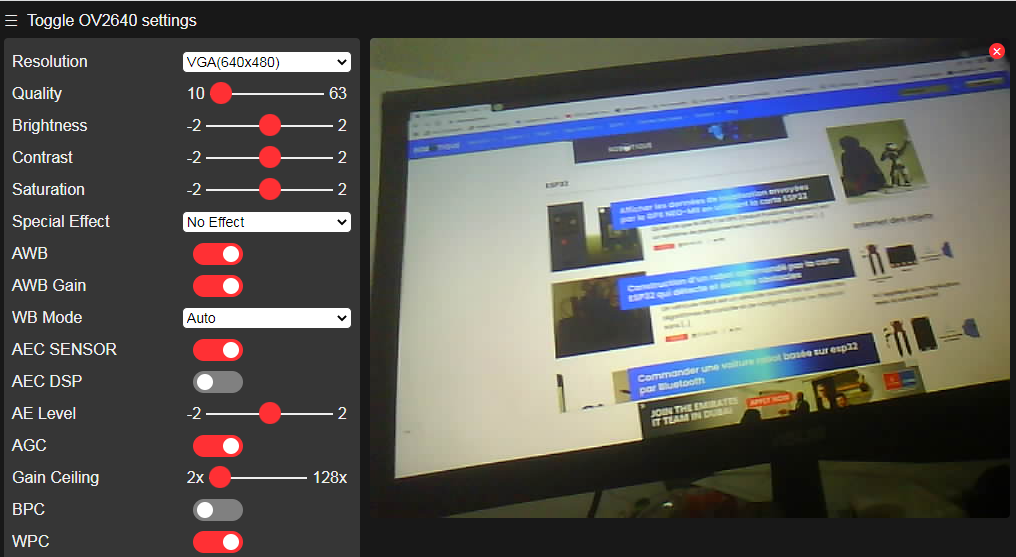
By using this project, you can easily create a web server to stream live video from ESP32-CAM.
You can also see

0 commentaire
Leave a comment


Recent tutorials


Most viewed tutorials


Most commented tutorials


Scroll to Top