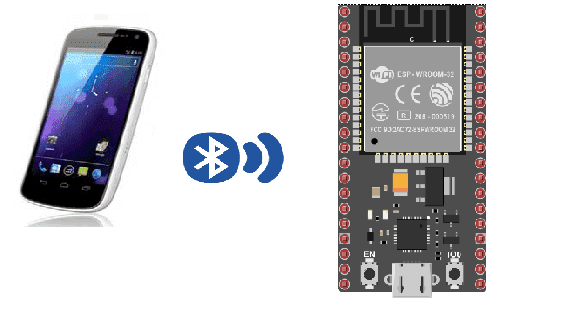
Connect the ESP32 board to the smartphone via Bluetooth

The ESP32 is a low-cost, low-power system on a chip (SoC) with Wi-Fi and Bluetooth capabilities. It is suitable for a variety of applications, including Internet of Things (IoT) and home automation. One of the features of the ESP32 is Bluetooth connectivity, which can be used to send and receive data wirelessly over a short distance. The ESP32 can function as a Bluetooth server, a Bluetooth client, or both at the same time. It can also support multiple connections at the same time.
It is possible to use an ESP32 in conjunction with a smartphone to build projects that use both devices. For example, you could use an ESP32 to control a device or display information, and use a smartphone as a remote control or to display additional information.
MIT App Inventor is a block-based programming tool that allows users to build Android apps without needing to know a programming language. It is designed to be accessible and easy to use, so it is a good choice for beginners or those who want to create an app quickly.
It is possible to use App Inventor to create an app that communicates with an ESP32 microcontroller over Bluetooth. To do this, you would need to set up the ESP32 as a Bluetooth server and then use the App Inventor Bluetooth component to connect to the ESP32 from the app. You can then send commands or data from the app to the ESP32 and receive responses or data from the ESP32 in the app.
To get started, you will need to have an ESP32 board, a smartphone or tablet with Bluetooth capabilities, and a computer with App Inventor installed. You will also need to configure the ESP32 to function as a Bluetooth server and test that it can establish a connection with your smartphone or tablet.
Purpose of this tutorial:
The objective of this tutorial is to be able to connect the ESP32 board to the smartphone via bluetooth.
This is why we will create two programs: a mobile application with App Inventor for the smartphone and a micropython program for the ESP32 card.
Necessary components
ESP32 card
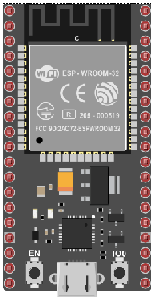
An ESP32 card is a physical device that includes an ESP32 microcontroller and associated components, such as memory and input/output (I/O) pins. These cards are typically designed to be easily integrated into a project or prototype, and can be plugged into a breadboard or other prototyping platform.
ESP32 cards are often used in Internet of Things (IoT) projects, as the ESP32 microcontroller has built-in WiFi and Bluetooth capabilities, making it well suited for connecting to the internet and communicating with other devices wirelessly. These cards may also include additional features such as sensors, OLED displays, or other components that can be used in a project.
Test plate
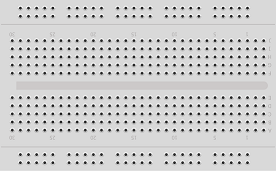
A test plate is a type of device used in robotics to test the functionality and performance of various components or systems. It is typically a physical platform or structure that is designed to hold and support various test items or devices, such as sensors, actuators, motors, or other types of mechanical or electrical components. Test plates can be used to simulate different environments or conditions, such as temperature, humidity, vibration, or other factors, in order to evaluate the performance of the components or systems being tested. They can also be used to perform a variety of diagnostic or diagnostic tests, such as stress testing, endurance testing, or other types of evaluations.
connecting wires

Wires are used to transmit electrical signals and power to various components such as motors, sensors, and microcontrollers. It’s important to properly route and secure the wires to prevent tangles and damage. There are several methods for doing this, including using cable ties, clamps, and wire looms. It’s also a good idea to use different colors or labeling to identify the different wires and their functions. When connecting wires in a robot, it’s important to follow proper safety procedures, such as using the correct wire stripper and connectors, and wearing protective equipment such as gloves and safety glasses.
SSD1306 Display
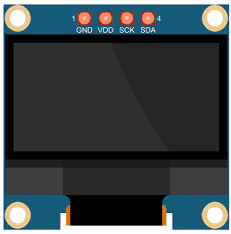
The SSD1306 is a monochrome display controller that is commonly used in small OLED (organic light-emitting diode) displays. It is designed to work with microcontrollers such as the Arduino, and can be used to display text, graphics, and other information.
The SSD1306 uses an I2C (Inter-Integrated Circuit) or SPI (Serial Peripheral Interface) interface to communicate with a microcontroller, and can be controlled using a library or driver specific to the display. The OLED display is typically driven by an SSD1306 display controller, which is a small chip that handles the display’s communication with a microcontroller and manages the display’s RAM (random access memory).
Assembly:
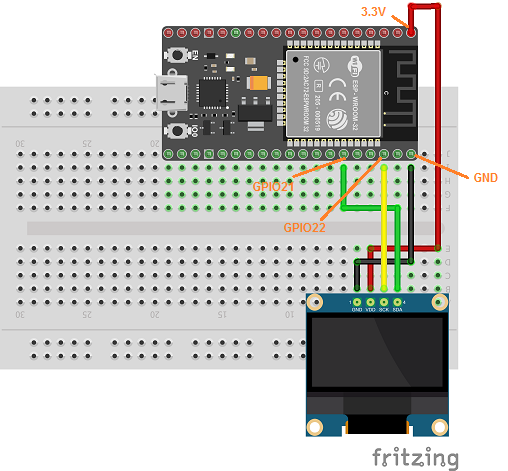
To carry out the assembly it is necessary to connect:
-
the SDA pin of the SSD1306 display to the GPIO21 pin of the ESP32 board
-
the SCL pin of the SSD1306 display to the GPIO22 pin of the ESP32 board
-
the GND pin of the SSD1306 display to the GND pin of the ESP32 board
-
the VCC pin of the SSD1306 display to the 3.3V pin of the ESP32 board
Micropython program
Here is the micropython program that connects the ESP32 board to the smartphone:
The word ‘connect’ is displayed if the ESP32 board is connected to the smartphone and the word ‘disconnect’ otherwise.
|
1 2 3 4 5 6 7 8 9 10 11 12 13 14 15 16 17 18 19 20 21 22 23 24 25 26 27 28 29 30 31 32 33 |
########## DIGITAL MANUFACTURING ########## # PIKACHU Project # Authors: Miguel Angel Guzman # Kadriye Nur Bakirci ########################################### ########## IMPORT REQUIRED LIBRARIES ########## import bluetooth from ble_uart_peripheral import BLEUART from machine import Pin, I2C, PWM import ssd1306 as ssd1306 # Configure Pins 22 and 21 as I2C Pins pour l'afficheur ssd1306 i2c = I2C(scl=Pin(22), sda=Pin(21)) # Create a OLED display object and connect it to active I2C bus display = ssd1306.SSD1306_I2C(128, 64, i2c) # Create BLE object ble = bluetooth.BLE() # Open UART session for BLE uart = BLEUART(ble) # Define ISR for an UART input on BLE connection def on_rx(): # Read UART string, AppInventor sends raw bytes uart_in = uart.read() # read the message received from the Smartphone via Bluetooth print("UART IN: ", uart_in) # display the message received from the Smartphone on the Thonny console display.fill(0) display.text(uart_in.decode(),10,10) #display the message received from the Smartphone on the ssd1306 display display.show() # Map ISR to UART read interrupt uart.irq(handler=on_rx) uart.close() |
You have to import these libraries:ble_uart_peripheral.py, ble_advertising.py and ssd1306.py
Creating the application with AppInventor:
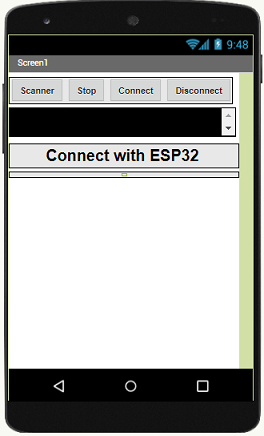
We will create a mobile application named ‘esp32_connection_smartphone’ with App Inventor which allows to connect the smartphone to the ESP32 board.
We therefore suggest that you create the design of the application, with the following visual:
Programming with App Inventor
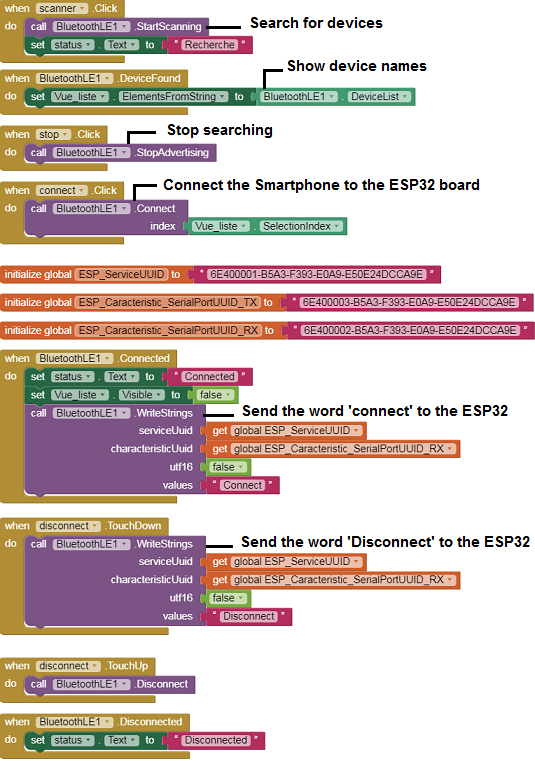
To program the application, App Inventor offers us to use the Blocks space which allows you to create a program in the form of a block diagram. Very easy to use but requires some programming logic.
Here is the program of the application made in the Blocks space of the App Inventor:
Remark:
After installing the mobile application on your Smartphone, you must follow these steps to connect to the ESP32 card you must:
-
Click on the ‘scan‘ button
-
After finding the Micro:bit card, Click on the ‘Stop‘ button
-
Press the name of the ESP32 board
-
Finally click on the ‘connect‘ button

