ESP32
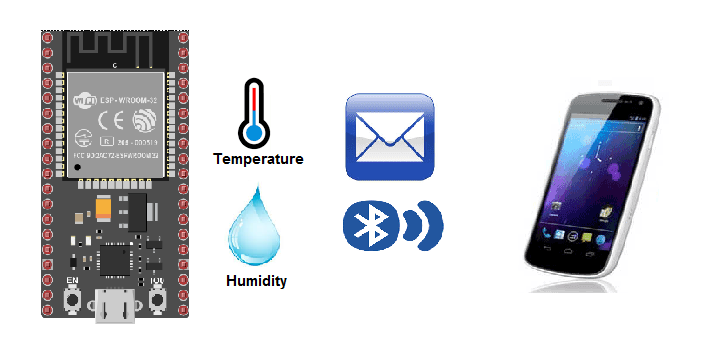
Bluetooth temperature and humidity logger based on ESP32 and Smartphone
The ESP32 is a microcontroller that has built-in WiFi and Bluetooth capabilities, making it well suited for Internet of Things (IoT) projects and other applications that require wireless communication.
To use the Bluetooth functionality of the ESP32, you will need to include the appropriate libraries in your code and configure the ESP32 to act as a Bluetooth server or client. You can then use functions provided by the library to send and receive data over Bluetooth.
There are many resources available online that can help you get started with using the Bluetooth functionality of the ESP32. Some things you might want to consider include:
The DHT11 is a low-cost temperature and humidity sensor that can be used in conjunction with the ESP32 to send temperature and humidity data over Bluetooth. To use the DHT11 with the ESP32, you will need to connect the DHT11 to the ESP32 and write code to read the temperature and humidity data from the DHT11 and transmit it over Bluetooth.
Purpose of this tutorial:
The Bluetooth temperature and humidity logger monitors temperature and humidity and uses Bluetooth Low Energy (BLE) technology to communicate wirelessly and send the data to the mobile application installed in the Smartphone.
The objective of this tutorial is to build a Bluetooth temperature and humidity logger based on the DHT11 temperature and humidity sensor, the ESP32 board and the Smartphone.
That’s why we’re going to create two programs: a mobile application with App Inventor for the smartphone and a micropython program for the ESP32 board.
This system connects via Bluetooth to the Smartphone and transmits the data.
Therefore, the Bluetooth temperature and humidity logger contains a smart humidity and temperature sensor with Bluetooth connectivity.
Necessary components
ESP32 card
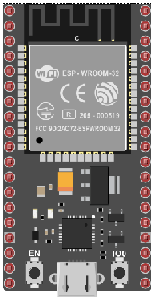
An ESP32 card is a physical device that includes an ESP32 microcontroller and associated components, such as memory and input/output (I/O) pins. These cards are typically designed to be easily integrated into a project or prototype, and can be plugged into a breadboard or other prototyping platform.
ESP32 cards are often used in Internet of Things (IoT) projects, as the ESP32 microcontroller has built-in WiFi and Bluetooth capabilities, making it well suited for connecting to the internet and communicating with other devices wirelessly. These cards may also include additional features such as sensors, OLED displays, or other components that can be used in a project.
DHT11 sensor
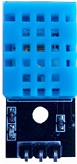
The DHT11 is a low-cost humidity and temperature sensor that is widely used in a variety of applications. It uses a capacitive humidity sensor and a thermistor to measure the surrounding air, and provides a digital output signal.
The DHT11 has a relatively simple interface, with just three pins: VCC, GND, and DATA. The VCC pin should be connected to a 3.3V power source, the GND pin should be connected to ground, and the DATA pin should be connected to a digital input pin on a microcontroller. The sensor will then output a stream of data on the DATA pin, which can be read by the microcontroller to obtain the humidity and temperature readings.
The DHT11 has a range of 20-90% relative humidity and a range of 0-50°C temperature, with an accuracy of ±5% for humidity and ±2°C for temperature. It is a relatively slow sensor, with a typical sampling rate of once per second.
test plate

A test plate is a type of device used in robotics to test the functionality and performance of various components or systems. It is typically a physical platform or structure that is designed to hold and support various test items or devices, such as sensors, actuators, motors, or other types of mechanical or electrical components. Test plates can be used to simulate different environments or conditions, such as temperature, humidity, vibration, or other factors, in order to evaluate the performance of the components or systems being tested. They can also be used to perform a variety of diagnostic or diagnostic tests, such as stress testing, endurance testing, or other types of evaluations.
connecting wires

Wires are used to transmit electrical signals and power to various components such as motors, sensors, and microcontrollers. It’s important to properly route and secure the wires to prevent tangles and damage. There are several methods for doing this, including using cable ties, clamps, and wire looms. It’s also a good idea to use different colors or labeling to identify the different wires and their functions. When connecting wires in a robot, it’s important to follow proper safety procedures, such as using the correct wire stripper and connectors, and wearing protective equipment such as gloves and safety glasses.
Assembly
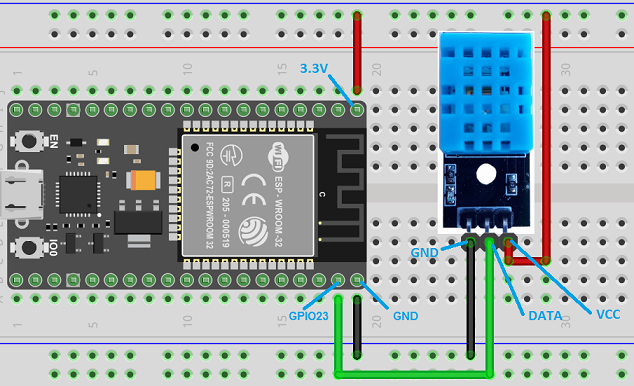
To carry out the assembly it is necessary to connect:
-
the GND pin of the DHT11 sensor to the GND pin of the ESP32 board
-
the DATA pin of the DHT11 sensor to the GPIO23 pin of the ESP32 board
-
the VCC pin of the DHT11 sensor to the 3.3V pin of the ESP32 board
Micropython program
Here is the micropython program that allows you to:
– measure temperature and humidity with the DHT11 sensor
– connect the ESP32 board to the smartphone via Bluetooth
– periodically send temperature and humidity
|
1 2 3 4 5 6 7 8 9 10 11 12 13 14 15 16 17 18 19 20 21 22 23 24 25 26 27 28 29 30 31 32 33 34 35 36 37 38 39 40 41 42 43 |
########## DIGITAL MANUFACTURING ########## # PIKACHU Project # Authors: Miguel Angel Guzman # Kadriye Nur Bakirci ########################################### ########## IMPORT REQUIRED LIBRARIES ########## import bluetooth from ble_uart_peripheral import BLEUART from machine import Pin import dht import time p23=Pin(23, Pin.IN)# link the ESP32 board to the DHT11 sensor d=dht.DHT11(p23) # Create BLE object ble = bluetooth.BLE() # Open UART session for BLE uart = BLEUART(ble) # Define ISR for an UART input on BLE connection def on_rx(): # Read UART string, AppInventor sends raw bytes uart_in = uart.read() # read the message received from the Smartphone via Bluetooth print("UART IN: ", uart_in.decode()) # display the message received from the Smartphone on the Thonny console # Map ISR to UART read interrupt def env_tx(val_tx): uart.write(str(val_tx) + '\n') print("tx", val_tx) # Map ISR to UART read interrupt uart.irq(handler=on_rx) while True: d.measure() #Measurement of temperature and Humidity t=d.temperature() #lire la temperature h=d.humidity() # lire l'humidity print('Temperature=', t, 'C') print('Humidity=', h) message=str(t)+" °C" env_tx(message) # send the temperature to the Smartphone message=str(h)+" %" env_tx(message) # send the humidity to the Smartphone time.sleep_ms(2000) uart.close() |
– You have to import these libraries :ble_uart_peripheral.py and ble_advertising.py.
– you must use the following firmware : esp32-20210902-v1.17.bin
Creating the application with AppInventor:
We will create a mobile application named ‘esp32_temperature_humidity’ with App Inventor which allows you to connect the smartphone to the ESP32 board and periodically receive the temperature and humidity measured by the DTH11 sensor.
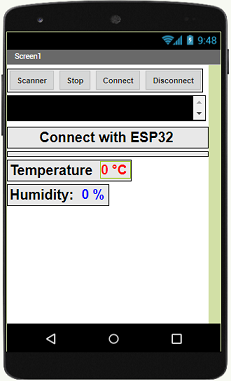
We therefore suggest that you create the design of the application, with the following visual:
Programming with App Inventor
To program the application, App Inventor offers us to use the Blocks space which allows you to create a program in the form of a block diagram. Very easy to use but requires some programming logic.
Here is the program of the application made in the Blocks space of the App Inventor:
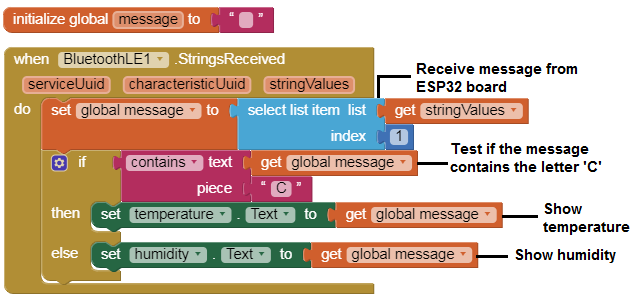
Remark:
After installing the mobile application on your Smartphone, you must follow these steps to connect to the ESP32 card you must:
-
Click on the ‘scan’ button
-
After finding the Micro:bit card, Click on the ‘Stop’ button
-
Press the name of the ESP32 board
-
Finally click on the ‘connect’ button
You can also see

0 commentaire
Leave a comment


Recent tutorials


Most viewed tutorials


Most commented tutorials


Scroll to Top